The Big Bang (How it All Began)
2025-04-103 min read
HomeLab: Initial Network Setup
Every production-grade network starts with a solid foundation — this post covers how I built mine from scratch using Proxmox, pfSense, and LXC containers, laying the groundwork for a segmented, scalable home lab.
This project documents the first working phase of my home network infrastructure. The design uses pfSense as a virtual firewall/router and LXC containers to host internal services, all running on Proxmox.
Overview
- Hypervisor: Proxmox VE running on Protectli Vault VP2420 (Intel J6412, 4 NICs)
- Router/Firewall: pfSense VM
- Internal Services:
- Pi-hole (LXC) — local recursive DNS + ad-blocking
- Omada Controller (LXC) — TP-Link AP management
- LAN Devices: Proxmox host, personal workstation, AP, switch
- Guest Devices: IoT & roommate devices on isolated VLAN 14
Infrastructure at a Glance
| Component | Description |
|---|---|
| pfSense | VM with two PCI-passthrough NICs (WAN + LAN) |
| vmbr0 | Bridge for LAN (Proxmox + LXCs) |
| vmbr1 | Reserved for future VLAN tagging (e.g., mgmt) |
| Pi-hole | LXC container for DNS (on LAN) |
| Omada Ctrl | LXC container managing TP-Link EAP670 AP |
| Cisco Switch | Access switch trunking VLANs to Proxmox/AP |
| Guest VLAN 14 | WiFi-only VLAN for roommate & IoT devices |
Setup Timeline
Phase 1 — Core Infrastructure
- Flashed Proxmox onto Protectli Vault
- Created pfSense VM with 2 passthrough NICs:
- WAN: connected to ISP modem
- LAN: connected to Cisco switch (trunk-ready)
- Configured
vmbr0as LAN bridge in Proxmox - Assigned a static IP to the Proxmox host on the LAN network
Phase 2 — Internal Services
- Provisioned LXC container for Pi-hole
- Static IP assigned
- Configured upstream DNS servers (e.g., Cloudflare)
- Provisioned LXC container for Omada Controller
- Used to manage TP-Link EAP670 AP
- Served on LAN via Omada web GUI (port 8043)
Phase 3 — Wireless & Guest VLAN
- Set up VLAN 14 in pfSense (Guest Network)
- Trunked VLANs through the switch port to the Omada AP
- Created an isolated wireless SSID mapped to VLAN 14
- Configured firewall rules in pfSense:
- Guests can access the WAN only
- Blocked access to LAN and Pi-hole
- Verified DHCP lease and internet access for guest clients
- Confirmed guest traffic was isolated from the personal network
Security Practices
- Created distinct VLANs for guest vs. personal network traffic
- Isolated Pi-hole to LAN access only
- Disabled inter-VLAN routing from Guest to LAN
- Assigned firewall rules per interface in pfSense
- Reserved management services for the trusted VLAN only
To-Do / Next Steps
- Create VLAN 99 for network management
- Move Proxmox GUI and Omada Controller to VLAN 99
- Add remote access via OpenVPN (completed later)
- Diagram full topology and backup strategy
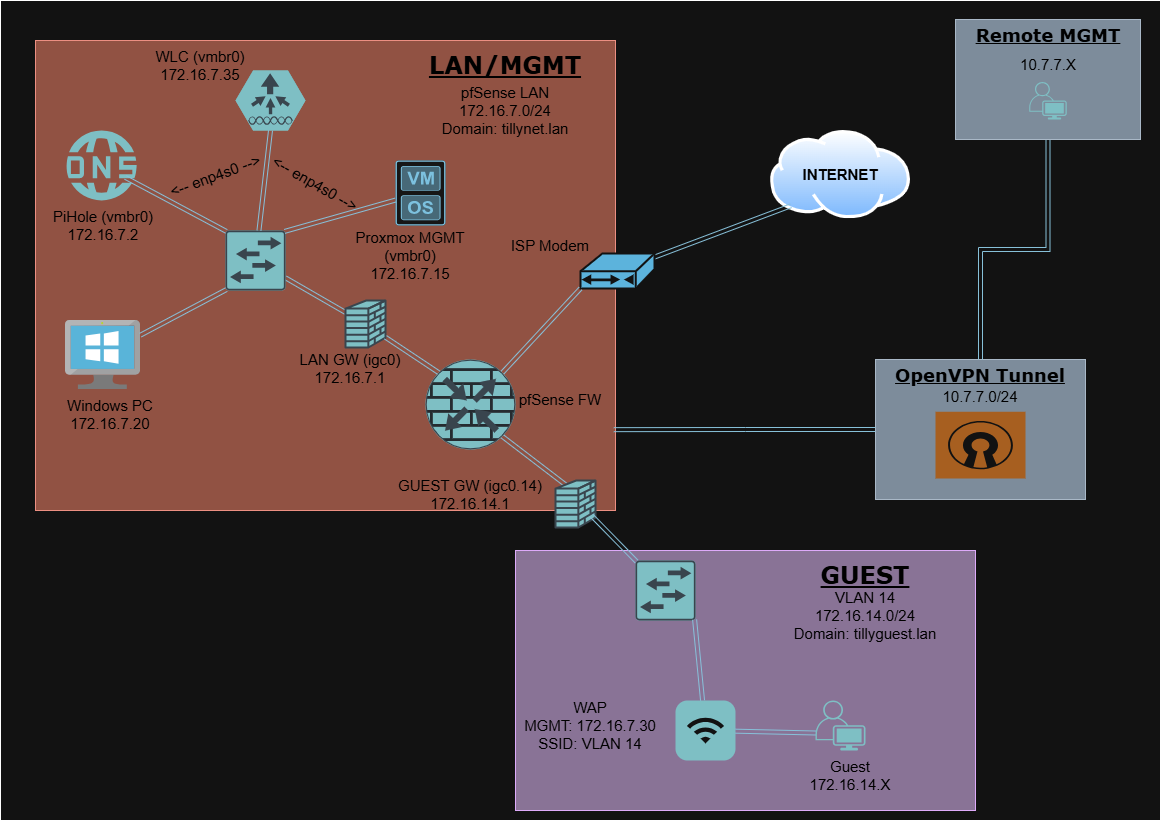
Network Diagram
Lessons Learned
- Always set a static fallback IP for management access. If you lock yourself out during a VLAN migration, a fallback IP on a known interface is your lifeline.
- pfSense + LXC containers is a powerful combination. Running your firewall as a VM alongside lightweight containers keeps the footprint small and the flexibility high.
- VLANs without firewall rules are just labels. Proper isolation requires explicit deny rules between segments — don't assume separation.
- Omada Controller punches above its weight. For a home lab, it delivers enterprise-style wireless management without the enterprise price tag.